In my efforts to build a cheap boat I have had to find a way of making cheap aluminium castings. It's not practical to go to a commercial foundry to get everything done, so the obvious answer is to make my own. I can now go out onto the patio and cast aluminium whenever I want.
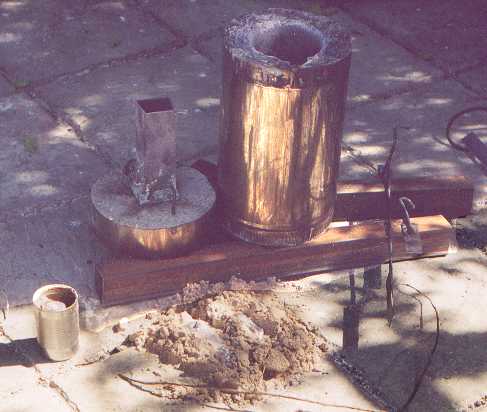
Here's a picture of my foundry:-
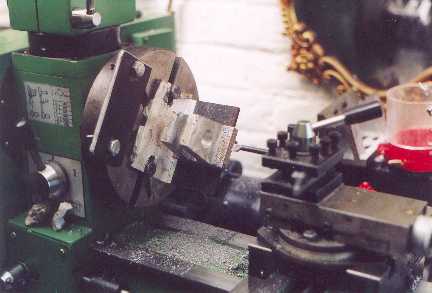
And here's a home made casting being machined up to take two bearings:-
With this equipment I can cast up to 1lb aluminium castings within 15 minutes of firing up the furnace. The whole lot cost me £2 (should cost about $2 in the US).
Interested?
Thought so.
The rest of the article is about how I made and use this ultra low tech foundry. It is not exhaustive, and I do not go to town about the very real dangers involved in handling liquid metal that's at least 660C. I assume you are sensible, and pretty handy. Don't prove me wrong!
The article is split into several sections (all on this one web page), as below:-
Safety Equipment
Raw Materials
The Furnace
The Crucible
Tools
The Mould
Fuel
In Use
What can be done?
At the very least you will need the following safety equipment:-
Heat Proof Boots (Safety Boots)
Leather Apron (Welder's Apron)
Face Shield
Heatproof Gauntlets (Welder's Gantlets)
While I would severely advise against it, with extreme care you can cast without this safety equipment - if its lack is the only thing stopping you from casting. Just be paranoid about ensuring everything is safe, there is no water near and everything is sensibly laid out when you cast. And get the safety equipment as soon as you can, because you will inevitably spill some molten aluminium one day. If you do this - remember it's at your own extreme risk.
I haven't had to rely on my safety equipment - yet. I have, however, had moulds bubble and blow back at me when I didn't put enough vent holes in. All the aluminium drops missed me, but had I not been pouring so carefully I would have been splattered. Be warned!
First, in order to cast aluminium, you do actually need some aluminium. Strangely enough, this is not all that easy to come by in the ordinary way of things, certainly not in largish quantities, especially if you won't want to buy any. So, start saving any aluminium scrap you can find - drinks cans, aluminium extrusion etc.
The best scrap you can find is stuff that's already been cast - as it'll be a good casting alloy. Keep an eye out for die cast electric motor housings, old car crank cases etc. I was very fortunate - I work for a manufacturing company and at the time I needed aluminium, they wanted to throw away 150 kg of aluminium castings. All were LM4 (the UK designation for moderate strength, non heat-treatable, sand castable, general use aluminium). I was in heaven! I later learned [the hard way] that it has not very good machining properties, but that's by the by.
If your scrap isn't too good, or it's very thin/ painted etc, you'll need to melt it down into ingots to get rid of slag and general rubbish from the aluminium. Having done that you can cast happily.
My furnace is a 9" (225mm) diameter x 20" (500mm) long stainless steel tube lined with 2" of ordinary concrete. The tube is stainless simply because that's what was in the skip when I looked. The length seemed about right for the crucible, some fuel and a bit of room. The diameter is a bit small, 10" or 11" (250 or 275mm) would have been better, but that's what was on offer & it's OK. Ordinary steel would be fine. Do not use plastic or aluminium, it could melt.
The cross section of the furnace is as below:-
The concrete refractory was made up as a pretty dry mix, then ladled and tamped into the tube (with the help of my then 3 year old daughter). I used another bit of SS ducting slit so that it stayed 5" (125mm) diameter as the inner former and used a catfood tin slit down to 2" (50mm) diameter as the tuyere former. After a day I removed the formers. The furnace was left to cure and dry for either 1 or 2 weeks (can't remember). After the drying period I lit a small wood fire in it to make sure it was completely free of moisture - but didn't take the temperature up too high.
One word of caution about the initial fire. Do not use wood from a Passion Vine. I did, as we had some prunings left over, and violently regretted it. The smoke from Passion Vine wood is disgusting. It made me retch and wish I'd never been born for a while. It really smelt as if I was making a bonfire of used childrens nappies [daipers]. Never again!
The furnace lid was a 2" (50mm) section of the ducting filled with a pretty dry mix of concrete firmly tamped in and two loops from 6mm diameter steel re-inforcing bar were embedded in the concrete. The smoke hole was left open by using another catfood tin former. This was dried at the same time as the furnace body.
The use of concrete as the refractory is OK at the low temperatures required for melting aluminium. If you want to melt brass or iron, then you must use a better refractory. The life of the furnace is not great. I get concrete spalling off every time I use it. Just remember - this is a very cheap furnace and it won't break the bank to replace it every now and again.
It would be a good idea to insulate the furnace if you can. Something like 'Rockwool' wouldn't melt onto the surface and should reduce the losses somewhat. At high temperatures the conductivity of air increases significantly, so you need more insulation than expected - however any insulation will help.
My crucible is nothing special. I measured up the inside of the furnace and found I could use a 50mm (2") steel box section with 5mm (3/16") thick walls from a scrap steel skip. The length I use is about 8" (200mm). I welded a flat steel base on it (roughly 6mm [1/4"] thick), filled it with water and checked for leaks. This is important because molten aluminium is very runny, and if water can get through a hole, so can the melt.
Having welded the base, I added two 6mm (1/4") diameter x 25mm (1") long steel trunnions on the corners at the top, and a loop (about 25mm diameter from 6mm rod) at the base of one of the other corners. This gives me a pouring spout without having to do any metal bashing. The Crucible looks as below:-
The crucible is possibly a little on the small side, but if I make it bigger I'll need more fuel, a bigger furnace etc. Basically, it's just OK for a 1lb casting and a sprue.
I have seen steel & iron crucibles criticised as some iron can dissolve in the aluminium melt causing it to be slightly more brittle. This is perfectly true. However, is it going to be a problem for home casting? I think not. If you are taking home casting to a level where it matters, then I suggest you look at a more advanced web site - say www.foundry-fopars.co.uk. Remember one thing though, steel crucibles rust rapidly in the furnace. You must inspect the crucible before you use it to ensure that there us a useful thickness of steel left. The bit that rusts fastest is the base (which is why I used a 6mm thick plate as the base). Making another crucible shouldn't break the bank.
You need to make four tools:-
A two pronged hook to loop over the crucible trunnions. Make from 6mm (1/4") steel bar, as below. The total length should be around 600mm (2ft).
A single pronged hook, used to remove the furnace lid when it's hot and tip the crucible to pour (using the loop at the base). Make from 6mm (1/4") steel bar, as sketched below. Total length around 600mm (2ft).
A skimming spoon, to get off the oxide floating on the surface of the aluminium. Use whatever you want for this (except either aluminium or plastic!).
A Poker. The poker ahould be a rod/ tube of at least 2ft (600mm) length, to dip into the melt to check it's fully liquid - make it of any metal except lead. If made of alumium, when the melt is up to temperature you will find the end melts away. If the poker is a tube, be aware that hot gasses may rise up the inside of the tube - so wear heat proof gloves when using a tube poker. My poker is a 15mm diameter copper water pipe offcut. Works well.
This bit sounds easy, but rest assured it's where most skill is needed in casting. I really do suggest that you beg/ borrow/ buy [last resort only] a book about casting so that you can read up on making the mould. There are many types of mould you can use, but I use a variant of sand casting.
Sand casting involves the use of sand (wow!) and a binder to form a void which is filled with molten metal. I used to use children's play sand (stolen from my daughters' sand pit once they were asleep - it was too dangerous to risk while they were awake) and a vegetable oil binder. I'd say this is adequate (rather than good) for very small castings, as the strength is poor and sometimes the mould collapsed as I made it, or stuck to the pattern I wanted to copy (which destroyed the finish). I now use damp building sand mixed with 5% clay cat litter. This works MUCH better than oil soaked sand when using mould boxes more than 7" (175mm) square. You try it yourself. I ended having to invest a whole £2.40 in a bag of sand. At my current usage rate, that bag will last me several years.
The pattern is a close to finished shape, slightly over-size copy of what you want to make. It's made 1.3% oversize to allow for shrinkage of the aluminium as it cools - though trying to get that accurate in home casting is a bit ambitious in my view. I tend to make all my patterns with timber salvaged from pallets, all sharp corners are smoothed with modelling clay, brick clay or mud dug from the garden. Where the pattern is to be used more than once I use car body filler rather than the more easily damaged materials mentioned earlier.
To make a mould, make up a four sided mould box (no top or bottom - often called a 'flask') from old timber that's big enough to have at least 50mm of sand all around the pattern. Then place the pattern in the box, and pack the sand in firmly around the pattern. Once the box is filled, turn the box over to reveal the underside of the pattern, place a parting material (brick dust or a thin plastic bag) on top of the exising mould, then put another mould box on top of this and repeat the process. This time however, leave a hole through the sand to the pattern (with a dowel) to fill the mould. Also make a well for a reservoir of aluminium and a couple of vent holes to let steam, air and carbon dioxide out (from the heat damaged oil binder).
When you're happy, split the mould and CAREFULLY remove the pattern. The brick dust/ plastic bag will be the split line through the sand. You now have a void the shape of the lump of aluminium you want to cast.
What fuel to use? I have used wood, charcoal and coal in my furnace. There follows a short discussion about the fuels..
Charcoal
Smoke not too unpleasant when it wafts over you. The disadvantages are that it is hydroscopic, and burns fairly rapidly. The hydroscopic problem means that with a second burn from a bag, you are unlikely to get the furnace hot enough for a melt unless you dry it first - use it for the BBQ instead!
Coal
I only used coal after I'd failed to get charcoal hot enough with an old bag. I use ordinary house coal smashed into small pieces. The smoke smells like a steam train, and is quite horrible to be in when it wafts over you for more than a second or two. However the time from firing up to pouring can be as low as 5 minutes. The heating rate can be tremendous and seeing blue/red flames roaring out of the smoke hole is awe inspiring! One thing though, MAKE SURE IT'S LOW-TAR COAL. My neighbour came rushing round once thinking I'd set the house alight, on seeing the amount of smoke that came off two tar filled lumps.
I have used Anthracite as the fuel (basically a high quality smokeless coal). It is better than ordinary coal in some ways. The smoke is much, much less. However the heat release rate is considerably lower when under the blast from the fan even if broken into small chunks. Having said that, my largest casting to date was done with anthracite and it was quite successful even though it took much longer from firing up to getting the melt. The total time to melt about a pound of aluminium was 35 minutes from firing, as opposed to 5 minutes with coal. This slower heating rate is gentler on the furnace and I'm sure it will last longer with this fuel. On a second attempt (on a windy day) I couldn't get the furnace up to full melting temperature, the aluminium stayed in the 'pasty' barely molten phase and wouldn't get any hotter. This was solved by sticking in small sticks split off a pallet - in two minutes the temperature had got up to a pouring temperature. If you have this sort of problem, try the solution!
Gas (Propane/ Butane)
So long as you have a suitable burner, use it! It's much less unpleasant than coal or charcoal. However the burners use a lot of expensive fuel. That said, if I had the choice and I was rich, I would probably use propane. But there again, if I were rich, I could well be getting someone else to do my casting.
Alternative Fuels
I have used wood successfully as a fuel. I have to confess that this surprised me rather a lot as I didn't think wood was suitable to get to a high enough temperature. I only tried it because I had no other fuel and my daughter wanted a 'Star Trek' style badge for dressing up with at school. I thought I'd have a go with dry timber salvaged from pallets. I used the densest dry wood I could find (it was softwood) and chopped it up into chunks around 2" x 1" x 1" (50mm x 25mm x 25mm) so that it would burn as fast as possible. The first load warmed the furnace, then I re-filled the furnace and added the crucible and hoped for the best. It actually worked a treat (apart from hot cinders being blown out of the smoke hole, causing a small burn on my arm). I did get rather a lot of cinders into the crucible due to the stength of the draft from the blower, however it all floated and gave me an excuse to use my skimming spoon.
As for cooking oil/ waste motor oil or any other 'alternative' fuel, I suggest that anyone knowing enough to consider them will easily be able to assess their suitability. There are furnaces that use these fuels, and I plan on building something like the furnace shown at www.artfulbodgermetalcasting.com after Tracy was kind enough to buy me the book for Christmas.
You will need the following tools (in addition to the ones made specially above):-
Torch (to see through the smoke hole into the crucible)
Blower (unless using a propane torch heater)
The following consumables will be needed too:-
Fuel
Fire Lighter
Matches
Mug of Tea (no British worker can be seen without one!)
The first thing to do when using the furnace is to clear the work area, and check (if using coal) that none of the neighbours have their washing out. They'll hate you even more than they do already if you make their washing smelly! Unless, of course, you're aiming to be unpopular with the neighbours for some reason [Revenge for that loud music at 2am last Sunday morning maybe? Been there, done that, very satisfying!].
Place the furnace on a heat resistant surface (I use two lengths of 50mm steel box section to avoid the risk of the hot base of the furnace spalling my patio stones or boiling water in the soil). Put a firelighter and the fuel into the furnace. I use 3 small fist sized lumps of coal for each melt. The lumps are smashed into pieces about 3/4" (20mm) square to speed the burn. Place the crucible containing some aluminium on top of this heap. Put the lid on the furnace.
Place the mould box near the furnace, but not close enough to trip over. Position all the tools comfortably and wear your safety equipment.
Now light the fire lighter and point the blower into the tuyere. I use an old electric paint stripper, and have made a heat shield from a pie tin to stop the plastic handle from melting and burning due to the radiant heat from the tuyere.
The furnace may start to smoke badly as it heats up (certain to if using coal). Then as the furnace gets up to temperature the smoke itself will burn, and flames will be seen shooting out of the smoke hole. If there is enough air the flames will be a clear blue-red, and the furnace will be roaring happily at you. If the flames are yellow, blow more air in.
Drink the tea while waiting for the furnace to heat up.
When the inner walls of the furnace glow a bright orange/yellow (seen through the smoke hole), check the crucible to see if the initial charge of aluminium has melted - use the torch. If it has, remove the furnace lid and add some more aluminium to the crucible to a maximum of threequarters full. I've seen texts saying that you should go by the colour of the crucible - it should be glowing a dull red. This is true, but pretty spurious information. Dull red seems like black against the bright colour of the furnace walls, and the only way you can tell is by withdrawing the crucible. Forget the books, I just use the torch.
Once you have enough aluminium melted in the crucible, remove the lid and remove the crucible. Skim oxide off the molten aluminium if necessary using the skimming spoon, and pour gently into the mould. Work quickly, but don't rush - that's the way to hurt yourself. If using vegetable oil bonded sand you will now be getting strange wafts of chips (or 'fries' for US readers), rest assured it's normal - that's just the oil getting very hot.
Having poured the aluminium, add more fuel to the furnace if a second melt is required, otherwise turn the blower off and let the furnace burn itself out. The castings can be removed from their mould box in an hour. The sand closest to the aluminium will be black, hard and crispy. However it can be removed from the bright, shiny, casting with ease. This is the point at which emotions become totally uncontainable and you proudly start stuffing an odd shaped lump of aluminium under everyone's nose saying
Sad, isn't it?
After the initial joy, you'll have to come back to earth and take some remedial action to make the casting useable. Certainly you'll have to cut off some sprues, and maybe file off some parting line excess. If this is the case, don't worry, just get out the file and start. It's probably best to keep the file well oiled with cutting oil (or motor oil if you haven't got any cutting oil). This will stop the file getting clogged with aluminium pins.
One thing to remember:-
After a melt, the surface of the furnace remains hot enough to boil water drops on contact for up to 4 hours! Keep children & pets away while it cools. When I told my then 3 year-old daughter that the furnace was hot, she naturally ran headlong towards it, holding her hand out shrieking 'Hot! Hot!'. Be careful with little kids, they don't understand the dangers.
Well, I'm in the process of re-building the 100 year old cast iron railings outside the house and replacing all the missing bits with aluminium. I need ten decorative castings to attach to the railings. The picture below shows the first of five replacement 'Fleur de Lils' as it was broken out of the mould. The casting is next to a broken and modified 'Fleur de Lils' we found in the garden that I used as a pattern - the pattern has a core print built into it out of timber and all was smoothed off with car body filler. I used car body filler to smooth the pattern because I need five of these and plasticine or clay wouldn't last for more than one moulding. You may just notice a core used to make a hole through the casting - this enables it to go around the existing railing. The core is wood - a lesson I've learnt now - Use sand cores like everyone else does! The wood charred and produced gasses which left a void in the casting, not enough to make it unusable, but big enough to be a problem.
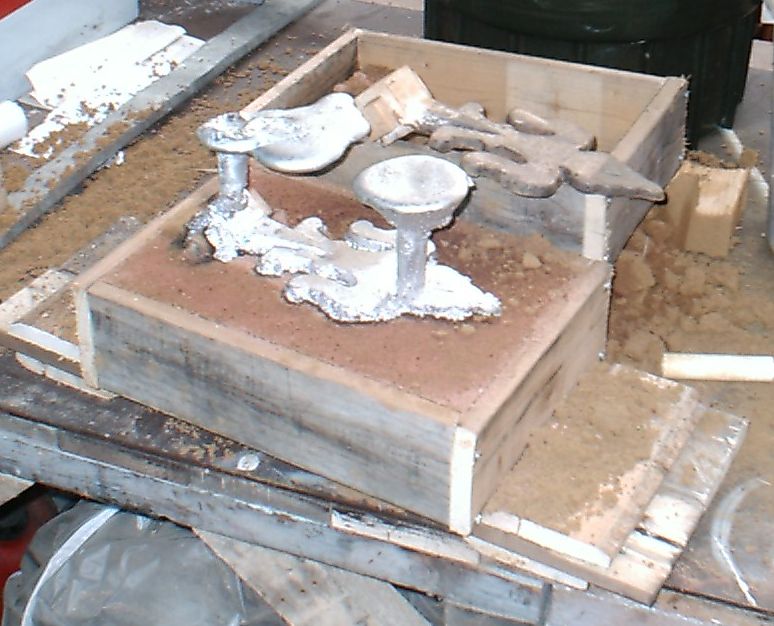
The big lump sticking up out of the casting on the right is the sprue and pouring well, and the big dribbly lump on the left is the venting sprue. The venting sprue told me when the casting was full. I poured in at a low point, and allowed the melt to come up out of the highest point. This ensured that the mould was full before I stopped pouring metal into it and allowed trapped air to get out of the mould without bubbling through the melt - thus avoiding hot splatters. Remember: Safety First! It saves nasty burns.
I need to make five of the 'Fleur de Lils', and here are the first two fettled up. The one on the right is the first one, the one on the left was my second casting. It's just a process of getting around to doing the rest of them now.
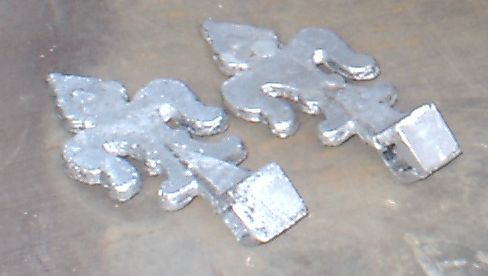
The surface finish difference is due to the way up they were cast. The front face on the left casting was on the bottom of the mould, and suffered from loose bits of sand in the mould. If you want a good face, make sure it's uppermost as on the casting on the right.
I usually make the sprue and pouring well of a size I can use for other projects when I cut it off. On a previous casting I used the sprue and well in the top of a home-made hand pump for my motor home. This one is un-decided at the moment, however I need some medium diameter aluminium for the crankshaft of 'Stirling One', a small Stirling Engine I want to make some time.
That's it. Casting aluminium is pretty easy, and a good way of saving money. I hope you enjoy it as much as I do.
For more home casting inspiration, see www.backyardmetalcasting.com, it's the site that gave me the confidence to try casting myself.
And confidence is all you really need.
After all, 3500 years ago people were casting bronze. The temperature to melt bronze is higher than aluminium, and they didn't have the technology or knowledge that is available to everyone these days. Go on, give it a try.
Chestnut Pens Miscellaneous Pages Home
Chestnut Pens Home